Making The Bobtail Rangerover |
Page Redesigned By Request |
|
I had several reasons for cutting
the back of my rangie;
- I kept getting crap in my fuel tank.
- I kept having to take my carbs of to
clean the crap out. Almost weekly I would have problems.
- My rear bodymounts had seen better days.
- I kept hanging the rear end when offroading.
- I always wanted a bobtail.
My thoughts were if the tank and pump were
inside the car then 'how could I get crap in them?' and 'If the tank comes in
the back then I just as well cut the back of the car off'. Hehehe... not so
easy... well... it seems easy enough!
I am determined NOT to end up with a pick-up like so many other bobtails do.
I know it will be a headache to do the sides and roof but it can be done.
Please bear in mind that my car is mine.
Everything I do is for myself. If you copy or attempt to do anything that you
see on this page or within my site you do at your own peril. I will try and
point you in the right direction. You mess up or cut your arm off... I don't
wanna know!!
Things done before Picture 1.
- Exhaust off.
- Aluminium floor out.
- Fuel tank out and fuel lines stripped out of
the way. (Both feed and return).
- I have no interior. No back seat etc. If you
have it... lose them now!
- Upper tailgate and lower tailgate taken off.
Electrics for wiper etc tied back.
- Outer rear side skins taken off.
- Rear quarter panels (these hold the lights) taken
off and electrics tied back out of the way.
- As my rangerover is of an age where it is all
bolted together, the big frame that holds the tailgates just unbolts.
- Side windows out.
I guess thats it.... next question is where do I
make the first cut? Well, every cut I made I decided as it all went along. It
was all a while ago but looking at the pictures brings alot of memories back.
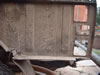
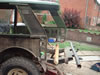
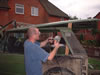
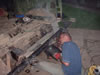
I wanted to keep a full wheel arch (see pic 1) so my 1st chalk line went just
next to it. Keeping the shape of the rear part of the inner wing I made a second
line. Again, see pic 1. After lots of measuring and sitting back to imagine
how it would look, checking and rechecking I made the first cut and trimmed
the 'very rear piece of inner wing' Pics 2, 3, 4, and 5 give a bit of insight
on how things were done/look. Pic 6 is a good picture that shows the shape of
the 'very rear piece of inner wing'. I have wedged it into position to see how
it will look.
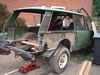
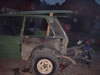
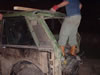
Pic 7. Do the same to the other side!!
Pic 8. Both sides gone and the roof is swinging in the breeze. I never took
the roof off at the start because I just guessed I wouldn't have to and if I
did I would!
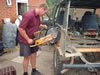
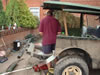
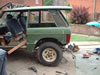
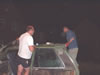
Pic 9 & 10. Get the welder in! Mark just loves a challenge. Both sides tacked
on and the rear frame partly bolted on to see if things were going well/straight.
Pic 11 & 12. The rear frame is on. Time to go to bed!
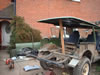
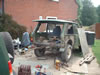
Pic 13. The chassis is cut back to a suitable point. (pic 14 shows this better)
and whilst waiting for the welder I started on measuring and cutting the outer
wing skins. Being aluminium they cut and shape real easy. Pic 13 also gives
a little insight as to how the finished product will look.
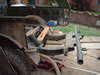
With the rear tailgate frame attached you can get a measurement of where the
chassis need to sit for the rear body mounts to line up.
Pic 15. Mark gets to work with his plates of steel and the chassis is back together
with new mounting rubbers and bolts.
Now for the biggest headache.By now you will realise that the roof is shaped
in many ways and is made of aluminium. As Mark doesn't have the equipment to
weld aluminium we decide to cut, overlap, seal and rivit. Pete turns up to help!
(Pic 18 & 19).
Although the pictures stop here their is still quite alot of work to do. In
no particular order;
- Both outer wings and light clusters on.
- Rear Tailgates.
- Re-wire both light clusters and rear tailgate
(number plate light), rear wiper motor and heated rear screen.
- Cut and re-fit floor section.
- Fit fuel tank inside and re-locate pump. I had
a fuel tank made. I re-located the pump so as to reduce the chance of getting
dirt in the fuel lines.
- Re-fit the windows and runners. I just measured
the whole and re-cut the runners. The window no longer opens and they are
overlaped.
So basically thats it!
I have 2 pics in the EFI album that show
my fuel tank and compressor (arb lockers) situated. Click here
to open the album in a seperate window. The spare wheel can also be seen as
it no longer can sit in its carrier behind the wheel arch.
One more problem.... THE BACK OF THE CAR SITS TOO HIGH!!!! Time for the Old
Man Emu upgrade.
Feel free to mail me if you have any questions.
01.jpg |
02.jpg |
03.jpg |
04.jpg |

05.jpg |
06.jpg |
07.jpg |
08.jpg |
09.jpg |
10.jpg |
11.jpg |

12.jpg |
13.jpg |
14.jpg |
15.jpg |
17.jpg |
18.jpg |
19.jpg |
20.jpg |
finished.jpg |